27 Dec 2017

SJCAM SJ8 Pro Will Be Coming Soon!!

SJCAM SJ8 Pro

Oh man, has SJCAM got news for you!
This is going to be a pretty long one, as what I am about to tell you will show how a Chinese company intends to jump into its next phase of products and seal its rank among the big guns.
We’ll talk about what the title says.
The upcoming dual-screen native-4K/60fps SJ8 PRO.
It is the newest action camera that SJCAM will use to shake up the market, yet again.
But first, the feature list:

SJ8 PRO FEATURES

     Ambarella H22S85
     SONY IMX377
     4K @60fps/ 1080p @120fps
     12MP Photos
     30M Water Resistant IP68 in Waterproof Case
     8x Zoom
     7G Aspherical Lens
     WiFi 2.4/5.8gGHz
     H.264/H.265
     1200mAh Battery
     Dual Stereo Microphones
     Cloud Storage
     Gyro Stabilization
     IPS 2.33″ IPS LCD Touchscreen
     0.96″ Front Screen
     Voice Control
SJCAM has been hard at work with this new souped-up camera, an amalgamation of all the strong points of the SJ6 Legend and the SJ7 Star, minus all the hiccups.
Ambarella Logo

With an Ambarella H22S85 System-on-Chip sitting mighty on the main board’s throne, this powerhouse of a chipset is capable of encoding in both H.264 (AVC) and the more recent H.265 (10-bit HEVC-10). What’s more is that it is driven by a Quad-Core ARM® Cortex-A53 for advanced analytics.
Yea, but what does it all mean? It means the SJ8 Pro will have plenty of room for great advancements and capabilities. It’s like growing an extra pair of arms and legs to use for working.
It also means 4K recording is just a regular task for the SJ8 Pro, as now it can easily do 60 fps. That’s twice the framerate of what the SJ7 can!
And on 1080p resolution, it can do 120 frames per second, piece of cake.
Sony Logo

Matched with a Sony IMX377 sensor, this makes the usage of the muscle-chipset worthwhile, as this is where the humongous 4K feed will come from.
7G Glass Lens

The 7-layer aspherical Glass lenses makes sure that images fed into the sensor are free from what are commonly called “aberrations” and other such visual abnormalities.
1200 mAh Battery

There are plenty that this thing will be boasting about, the 1200mAh battery will surely be enough to power the SJ8 Pro for well more than an hour of recording, and possibly a lot more at lower resolutions.
If you look at the specifications list, you will see Dual Stereo Microphones which could very well be intended for the rumored noise-cancellation other than just for Stereoscopic audio (left and right), which is also a first in the SJCAM action camera line, again we’ll see how this goes upon the release, roughly set towards the end of January or early February 2018.
SJ8 Pro

I was informed that the bigger and remarkably wider 2.33-inch touchscreen is not just an IPS display (In-Plane Switching), but also packs a helluva lot more pixels-per-inch and looks very much like the screens of the top 2 phone maker’s flagship phones. What’s even crazier is that the interface is a lot more fluid and and several generations ahead in response time than previous touchscreen models. This is one camera to beat.
SJ8 Pro Front LCD

And like the SJ6 Legend, the SJ8 Pro will have a front LCD screen, albeit small for 0.96 inches, is useful when setting the camera down on a tripod or a mount so you can see what’s happening while controlling it with the SJRemote.
This camera, like with any other SJCAM action camera, will use a waterproof case for diving up to 30 Meters below surface of water. There’s also 8x digital zoom in the specs, but any camera enthusiast worth his salt knows that magnifying an image digitally is nothing more than just cropping the image and presenting it to you at full screen.
4K EIS

What’s exciting to find out is the new gyro stabilization (aka EIS). It will most highly likely be up to 4K @30fps so rounding out the bumps in real-time video recording at that level will be a feat in itself, but we’ll soon see how that will be implemented.
But wait! There’s more! The SJ8 Pro will be using USB-C for many purposes. Expect faster data transfers, better FPV/drone control, and even live-preview, all in just one micro port.
Of course, like the previous model-series releases, RAW and Distortion Correction will be there too, only faster and processed more efficiently.
And just before I wrap this up, I know you’re asking what that cloud storage and voice control in the feature list are about. Not mentioned in there, too, is the much-rumored GPS. I guess we’ll have to wait until we get some more info on that. Stay tuned and also check out the News Pages on the Official SJCAM Website.
Oh and, there will be 2 other variants of the SJ8: SJ8 Air and SJ8 Plus.
The Air model will utilize a Novatek NT96658 chipset matched to a Panasonic MN34110PA sensor, and like in the SJ6 series, will not have the front screen; while the Plus model is rumored to use a Novatek NT96683 and matched to a Sony IMX117. Those are absolutely solid combos, but will still place the SJ8 Pro model way ahead of the pack. We truly are seeing better and better specs from SJCAM and it seems they are in a roll and gaining on the competition. We’ll see how this goes.
Meanwhile, get your wallet ready. You already know you want this.
I hear there’s chatter in the community forums as well, so take a peek in there or join in the discussions.
That’s it for now, until the next update.


SJCAM Camera Official Site: http://sjcam.com/


19 Dec 2017

How To Disable The Camera Shutter Sound In Blackview BV6000

Blackview BV6000 Smartphone


Most Android smartphones, that are manufactured today produce a fake camera shutter sound when you click a picture. This sound can be loud and bothersome, especially when you’re trying to snap a bunch of selfies or discreetly snap a candid photograph of a friend. Getting rid of the camera shutter sound can be as easy as turning down the volume on some Android devices, whilst for others, especially the Blackview BV6000 Android smartphone require a little more effort. Find out how to turn off the camera shutter sound on your device below.

As always, here is a little warning to those who want to try this out.

Before you turn off the camera shutter sounds on your Blackview BV6000 Android smartphone, here's a word of caution. In some countries, privacy laws make it unlawful for anyone to turn-off their camera shutter sound. Make sure that it is legal in your country and also your location before following any of the instructions below.

All these methods are listed so that you could find a solution to the shutter sound issue before the last method could be executed, as the last solution is sure to work.

So let’s list out the methods that have been used by many Blackview BV6000 users.

Firstly, you could find an option to simply turn off the camera shutter sound in the camera settings which seems to work in some build versions of Blackview BV6000.

Also, in many cases, your phone's camera shutter sound could be overridden by the sound profile settings. So, if you turn the phone sound profile to silent, you wouldn't hear any sounds from the camera while clicking photographs anyway. This can be done using the volume keys on the side of your device that act as master volume controls, or you could try to turn your notification settings to Do Not Disturb.

Furthermore, devices like the Blackview BV6000 smartphone run on stock versions of Android on which none of the above-listed methods work. Then you could try this final method to turn-off the camera shutter sound in your Blackview BV6000 in any build version of the Android OS it may have.

This is the last and final arrow in the quiver of solutions for disabling the camera shutter sound which is actually the easiest one.

But, for this, you first need a rooted Blsmartphone in order to gain access to the system files and folders. Then you need to browse through to system/media/audio/ui and find the file "camera_click.ogg" and change its name to something other than the default, for instance, "camera_clic.ogg". Refer to the images below for guidance. After this, you may check the results and take silent pictures without any sound. 


camera_click.ogg rename
Rename camera_click.ogg to camera_clic.ogg


If you find the shutter sound still persists, reboot your device and check again.

You may revert back from this setting by changing the name back to "camera_click.ogg" restores the shutter sound to normal.

This process is further made easier by using the ES File Explorer File Manager app available for free in the app store. This app is very user-friendly and very easy to browse through to the designated location. But the only downside of this method is rooting your device which is non-reversible.

ES File Explorer File Manager

ES File Explorer File Manager


Follow the link below to root your android Blackview BV6000 device and follow the last method and get rid of the camera shutter sound.


That's all my friends! 

You have successfully completed the turning off the camera shutter sound for your Blackview BV6000 smartphone.

If you face any issues please leave comments regarding this guide, also let me know of the successes or problems that you may be facing, please let me know.


Your feedback is gladly appreciated.


8 Aug 2017

Flashing Guide Blackview BV6000 Smartphone ROM [Nougat 7.0]


Android OS is great, but sometimes, the version you get with your Blackview BV6000 leaves a bit more to desire. Here is a quick flashing guide on how to install a new version of Android version (or ROM) on your Blackview BV6000 for an even better Android experience.

Blackview_BV6000_device

What's a ROM?

The openness of the Android platform has a great advantage to it, which is if you are unsatisfied with the default Stock Firmware OS, you can install a new one out of the many modified versions of Android (called ROMs) on your Blackview BV6000 device. A newly installed ROM can bring you the latest version of Android experience before the manufacturer does it, or it can also substitute the manufacturer’s modded version of Android with a clean dependable stock version firmware. Or furthermore, you could keep your existing Android version and just upgrade it with awesome new features— that's up to you.

Each version of the Android OS has a specific goal in mind, and each one differs from the others in one aspect or the other. Which one you pick is according to on your main concerns, your priorities and how you want to customize your device.


WARNINGPLEASE PROCEED WITH THE FLASHING GUIDE AT YOUR OWN RISK. ANY KIND OF BRICKING OR SYSTEM FAILURE WILL NOT BE MY RESPONSIBILITY.

Before flashing your BV6000 you will need:

PLEASE NOTE THIS FIRMWARE IS AN OFFICIAL RELEASE BY BLACKVIEW

Procedure: 

1.     First of all, make sure that you have MediaTek DA USB VCOM drivers installed on your PC.
2.     Next, turn off your smartphone and disconnect it from your PC.
3.     Download the Stock Firmware (called ROM) file and extract the contents into a folder. Search if there is a Checksum.ini file present in the extracted data, remove it as it could cause issues during the flashing process.
4.     Open up the extracted SP Flash Tool folder and locate the flash_tool.exe file. Right click on the file and Run as Administrator.

SP_flash_tool

Run_as_admin


5.     Click Scatter-loading button to load the correct scatter file.
6.     Browse the location of file in the extracted Stock Firmware folder and choose the “Scatter File” named as “MT65xx Android scatter”.

Scatter_loading_sequence

7.     After the desired scatter file is loaded in SP Flash tool with all the components of the program loaded in the checklist as shown.

Checkbox_ticked

Note: Make sure all the files of the firmware are checked automatically.

8.     If all the files are checked, select download only in the box as shown. Now, press “Download” button in the flash tool and putting the flashing process in standby mode. Waiting for the device to be connected via USB cable.

Flashing_ROM_image


9.     At this point, plug-in the USB cable to phone to connect it to your PC.

WARNING: Do not disturb the device or switch it on or cancel the flashing process as it may possibly hard brick your device.

10. The process will begin and a series of Red, Purple and Yellow progress stripes will successively show at the bottom of the SP Flash Tool.
11. Wait for the process to end at which point “Download Ok” notification will appear on a green circle.

download_ok

12. Plug out the device from the USB cable, now normally switch on your Blackview BV6000. After the flashing the first load of your Blackview BV6000 will take some time (1 - 5 minutes).

Rooting further takes you a step closer to actually owning the device and also install TWRP as your default recovery mode for better interface (click here for more info).


ADDITIONAL INFORMATION: (not mandatory)


Here is a link to the older Android v6.0 [Marshmallow] if you want to roll back to the previous version of Android. You may do so by using this link.


Good news for people who updated this version is that there is and OTA update for this version for NON-ROOTED devices. You may try it update the system software after following the process described above.

13 Jun 2017

Rooting Guide for Blackview BV6000 (TWRP included) on Win 7

Rooting your Blackview BV6000 Android device roughly revolves around the experience of unlocking of the Android OS so that you become a ‘Rooted user’’. The rooted user can on wish install/uninstall anything that is out there on the Google Play Store. Moreover, it also lets the device owner to consider changing the Blackview BV6000 Official StockROM for a Custom ROM. Android app developers do not offer people the chance to become a rooted user immediately because the device is vulnerable that way and it isn’t right to give the user a device that is susceptible given the fact that many people using Blackview BV6000 Android devices have little to no knowledge about what they are doing over the internet. Android developers have organized is allowing people to become rooted users, should they choose, because there are many reasons for becoming the rooted user, including if you wish to do some developmental works.

Blackview_BV6000_device
If you are like me, who consider owning a phone completely and look frantically for a perfect Rooting Guide for your device (in this case it is Blackview BV6000 Android phone) after sometime of using it on factory settings. You will be glad to have stumbled on this page because my dear friend you don't have to look any further. I've brought to you this Rooting Guide to you. The pain of scouting dozens of sites for the correct Rooting Guide and working links of the softwares. (I have been there. I know the pain and the disappointment of broken links)

The primary step of this process is to download all the necessary drives and softwares required throughout the process.

SO LET'S GET ON WITH IT RIGHT AWAY!!

IMPORTANT NOTE: READ ALL THE STEPS CAREFULLY FIRST AND THEN START WORKING YOUR WAY THROUGH ALL THE STEPS OF THIS ROOTING PROCESS.

WARNING: PLEASE PROCEED WITH THE ROOTING GUIDE AT YOUR OWN RISK. ANY KIND OF BRICKING OR SYSTEM FAILURE WILL NOT BE MY RESPONSIBILITY.

Even if you are a newbie to this rooting process, my only advice is initially read all the steps till the end and then start TWRP, rooting and so on.

For the first step you need to install the TWRP custom recovery image on your Blackview BV6000.

A reminder to you, this process does contain fair amount of steps, although most of them might take just a few seconds to complete flawlessly.

If these steps appear intimidating, do not worry, just proceed with each step one after the other and you will finish with this rooting procedure with a flawlessly rooted Blackview BV6000 within a few minutes.


1. Files to download (necessary)

Note: Just click on the highlighted names of these softwares to be redirected to the file location for download.

MediaTek MTK 67xx preloader driver pack – These drivers permit the MTK SP Flash Tool to connect with your mobile at an intricate level.

SP Flash Tool for MT6755 – This is the primary tool that will be used to flash your Blackview BV6000 smartphone with the TWRP software.

Blackview BV6000 TWRP Recovery image

Blackview BV6000 Super SU (2016_06_08)

(COPY THIS FILE INTO YOUR EXTERNAL CARD BEFORE PROCEEDING WITH THE ROOTING PROCESS) you’ll be thanking me later.

Blackview BV6000 Scatter File (2016_06_08 MT6755_Android_scatter.txt)


NOTE: The scatter file conveys the SP Flash Tool where it has to flash the numerous sections of the firmware on your phone’s EMMC

The scatter file was extracted from a 2016-06-08 Blackview BV6000 ROM, so if you are using a ROM other than the 2016_06_08 build number, it is really unlikely that the location of the Recovery.img will change, but there’s always a slight chance of that happening.

If you are in the least bit of doubt about it, download the ROM file that you are presently using, if you haven’t already downloaded it, and use the scatter.txt file from that ROM.

2. Install MediaTek MT67xx preloader drivers

                     NOTE - If you can’t continue with the driver install proceed to step #3.
  • Open the MediaTek MTK 67xx preloader driver pack from step #1 in WinRAR.
  • You don't have to extract all these files; just double click DriverInstall.exe (or installdrv64.exe for 64 bit Windows)
  • Agree to all permission requests during the installation process.
  • Click ‘OK’ to end the installation process and check the status of the drivers that are being installed in the system tray.


3. Install the SP Flash Tool and run the application

  • After you have downloaded the latest SP Flash Tool from the link, extract the same to a folder on your computer where you will know where it is.
  • Now go to this extracted folder.
  • And, now Right-click on the file named ‘flash_tool.exe’ and select the ‘Run as administrator’ option.
SP_flash_tool


Run_as_Admin


4. Load up the  scatter file for Blackview BV6000

  • If not already done, extract the Scatter File for Blackview BV6000 (MT6755_Android_scatter.txt) to a folder, where you will know where it is kept.
  • Select the option ‘scatter-loading’ from top-right section of the SP Flash Tool.

Scatter_loading_sequence


  • Direct the SP Flash Tools to the folder that you extracted the TWRP pack for the Blackview BV6000 to select the ‘MT6755_Android_scatter.txt
  • In the bottom portion of SP Flash Tools a checklist showing different sections of the ROM will then show.

5. Select the Blackview BV6000 TWRP custom recovery

  • If something else is selected in addition to ‘recovery.img’, deselect all of those.
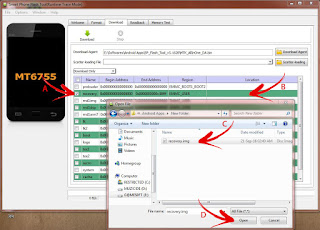
  • Now, double click ‘recovery.img’ line in the SP Flash Tools.
  • Direct the SP Flash Tool dialog box to the earlier extracted Blackview BV6000 TWRP image file (‘recovery.img’ in the TWRP pack)
Recovery_file_loading


6. Flash TWRP for your Blackview BV6000

  • Make certain the device is not connect to the PC and also that it is switched-off.
  • Make certain the box above says ‘Download Only’ as in the image.
  • Select ‘Download’ at the top of the SP Flash Tools.
  • Now, connect the USB cable to your device. Within seconds, you will see a red bar on the lower status bar. Wait for a few seconds, the flash should start shortly.
  • It will finish in a few seconds, at this point you will see a dialog box from SP Flash Tools showing a message "Download OK" which means that the flash has been completed.
flashing_recovery_image


download_ok


When you see the image above that means the flashing is completed.

7. Boot your Blackview BV6000 into TWRP recovery mode and start the rooting process

  • Upon completion of the flashing process, disconnect your device from the PC.
  • Press the Volume Up + Power buttons simultaneously until you see Blackview logo, now release the Power button only, and continue holding the Volume Up button until you see your device booting into the TWRP mode.
  • Flash the SuperSU.zip using the Blackview BV6000 Root pack that you copied to your external card before beginning this process.

If you want you may wipe data and cache using the TWRP mode and then flash the root file.


That is all my friend! 

You have successfully completed the rooting process for your Blackview BV6000 Android smartphone. You now have a rooted Blackview BV6000 and also a default TWRP mode.

If you face any issues please leave comments regarding this rooting guide, also let me know of the successes or problems that you may be facing, please let me know.

If you want to enjoy some really cool blogs on Digital Tech check this link here.

Your feedback will be gladly appreciated.